Table of Content
Two or all four of these triangles will have tabs on them. Once cut out, the four triangles will come together and join at the top to form the pyramid faces. This article has been viewed 235,383 times.
Plug in a glue gun and set it down nearby to let the glue heat up. Use both hands to hold 2 triangles with their bases flat on the work surface and lean them together so that 2 of their edges meet. Use your nondominant hand to hold them together near the top as you grab your glue gun. Pull the trigger on the glue gun as you slide it along the edge where your 2 faces meet.
Step 3: Make a Big Pyramid
Draw vertical and horizontal lines with a permanent marker to make bricks. To make your pyramid look like it's made out of individual bricks, draw a series of parallel lines horizontally along each face of your pyramid with a black marker. The lines don't need to be perfectly straight if you want it to look natural, but you can choose to make them even with a straight edge if you'd like. Make vertical marks between each horizontal row every 1–2 inches (2.5–5.1 cm) to create the appearance of individual bricks.
Lay your cut-out shape flat on your work surface. Use your nondominant hand to brace the paper along each side of your square before folding each triangle towards the center. Use the pad of your finger to firmly press down along each fold.
Precision Pyramids
As shown in red, we are making a crease only on the middle portion. Fold a corner to where the diagonal creases make an “x” and then crease the portion shown. In steps 3-4, we took care of one corner, so we just need to do the same thing for the other three corners. I folded the right edge to the center, so now let’s do the left. You will crease all the way to the diagonal crease line shown in the white circle. Crease about three-fourths of the way along the edge, as shown in red.
You can use a Styrofoam tray or wood surface as a base if you prefer. Press your tape down slowly and delicately. There's nothing but air inside your pyramid, and you don't want to crush it while you're taping it.
What supplies do I need to make candles?
We also have a guide for folding a dollar bill into a pyramid, or you can check out another similar origami guide like the origami box. After unfolding the second time, you should now have two crossing creases. Before starting please choose a place that is hygienic and clean to prevent contamination of the pyramid from any pollutants.
Draw another triangle on the right plane with the vertices adjoining the sides of the triangle. Extrude cut the part out side the triangle to form a pyramid. We see distant ancestors of Homo sapiens - apes. Here, one of them just took a stick in its paw and began to crack a nut for lunch! Feels like you are at the movie set filming Space Odyssey. First, apes used sticks, and later they started using stones.
The World's Finest Wood Pyramids
This article was co-authored by wikiHow staff writer, Sophia Latorre. Sophia Latorre is a Content Manager on the wikiHow team. Before joining wikiHow, Sophia worked as a technical editor and was published in six International Energy Agency Wind Annual Reports. Now, she writes, edits, and reviews articles for the wikiHow Content Team, working to make the content as helpful as possible for readers worldwide. Sophia holds a BA in English from Colorado State University. This article has been viewed 703,282 times.

"I was unsure how to make it it look effective, so the tips came in handy, the lines and sprinkling the sand on. Thanks to all authors for creating a page that has been read 703,282 times. Decorate the area around the base of the pyramid with sand, a faux Nile River, and other Egyptian elements. Working with glue is messy so lay newspapers down before you start.
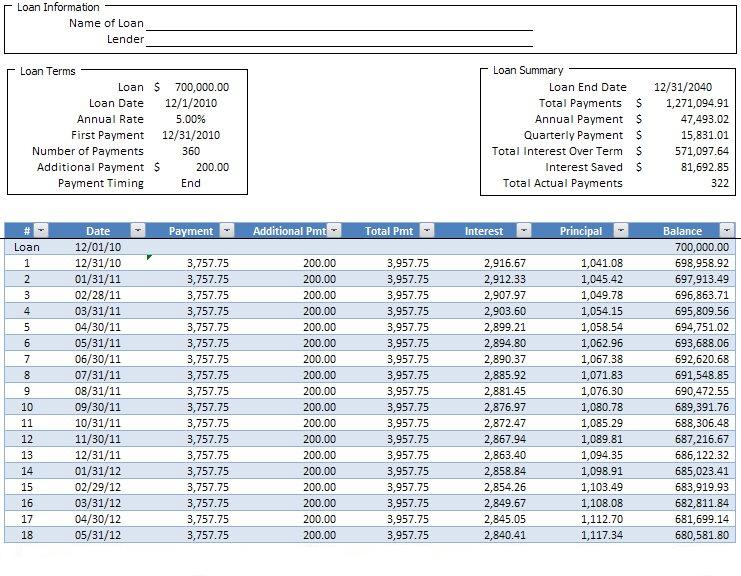
Hold your 2 sides still for seconds to give your glue time to initially dry. Set your 2 pieces aside and leave them for minutes to let the glue fully set. For the scale model, each connecting line should be 7.3 centimetres (2.9 in). You should now be looking at 4 triangles that share a base with the 4 sides of your square. Candle wax is an oil-based product and will not mix with water. You do not add additional water when melting wax melts in a wax burner.

Use a paintbrush to paint the entire pyramid a sandy brown color. Use only a small amount of paint, and be careful not to damage the pyramid as you go. Cut a 6-inch by 6-inch (15.2 cm by 15.2 cm) square out of the clay.